概要
WPF の DataGrid コントロールは、列ヘッダーをクリックするだけで行を昇順・降順に並び替える機能を標準で備えている。
CanUserSortColumns が true(デフォルト)の状態で SortMemberPath を解決できれば、追加コードなしにソートを操作できる。
一方、実務では標準機能だけでは足りず、プログラムからのソート、独自の比較ロジック、未ソート状態への復帰などが必要になる場面が多い。
本記事では基本の使い方に加えて、これらの要件それぞれに対する実装パターンを解説する。
前提・対象環境
- フレームワーク / 言語: .NET 6 以降 / C# 10
- 対象コントロール: WPF
DataGrid(System.Windows.Controls) - アーキテクチャ: コードビハインド・MVVM のいずれにも適用可能
以降の例では、Name と Price プロパティを持つ Product 型のコレクションに DataGrid がバインドされていることを前提とする。
デフォルトのソート設定
DataGrid の各列は、SortMemberPath がバインド先のデータソースに対して解決できる限り、標準で並び替え可能になる。
<DataGrid ItemsSource="{Binding Products}"
          AutoGenerateColumns="False"
          CanUserSortColumns="True">
  <DataGrid.Columns>
    <DataGridTextColumn Header="商品名"  Binding="{Binding Name}"  SortMemberPath="Name" />
    <DataGridTextColumn Header="価格"   Binding="{Binding Price}" SortMemberPath="Price" />
  </DataGrid.Columns>
</DataGrid>
列ヘッダーを 1 回クリックで昇順、もう 1 回で降順に切り替わる。
標準機能では未ソート状態への復帰は行われないため、解除が必要な場合はコードで明示的に制御する。
未ソート状態へ戻す実装については WPF DataGrid のソート状態をリセットする方法 を参照する。
コードでソートを制御する
DataGrid.Items.SortDescriptions を直接操作することで、ユーザー操作を介さずプログラムからソートをかけられる。
using System.ComponentModel;

dataGrid.Items.SortDescriptions.Clear();
dataGrid.Items.SortDescriptions.Add(
    new SortDescription(nameof(Product.Price), ListSortDirection.Descending));
dataGrid.Items.Refresh();
このとき、列ヘッダーに表示されるソートグリフ(矢印)も同期させる。
foreach (var col in dataGrid.Columns)
    col.SortDirection = null;

var priceCol = dataGrid.Columns.First(c => c.SortMemberPath == nameof(Product.Price));
priceCol.SortDirection = ListSortDirection.Descending;
グリフを更新しないと、行は正しく並んでいるのにヘッダーの矢印が以前の列を指したままになり、ソート状態がユーザーには不整合に見える。
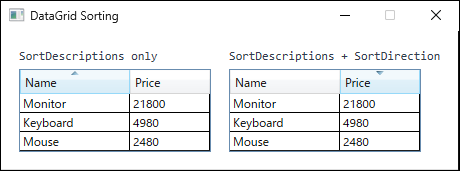
Name の昇順で表示していた状態から、SortDescriptions を Price の降順へ差し替えた直後。左は SortDescriptions だけを更新したため、行は Price の降順になっているのに矢印が Name 列に残る。右は SortDirection も更新しており、矢印が Price 列の降順を指している。ListCollectionView によるカスタムソート
大文字小文字を区別しない文字列ソートや、public プロパティとして公開されていない式による並び替えなど、標準の SortDescription では表現できない比較規則が必要なケースでは ListCollectionView.CustomSort を使う(SortDescription は getter が値を計算する public プロパティなら並び替えできるが、プロパティとして公開されていない比較には対応できない)。
なお、複数キーによる多段ソートは SortDescriptions に複数の SortDescription を追加すれば表現できるため、CustomSort は不要である。
ここで注意が必要なのは戻り値の型である。
CollectionViewSource.GetDefaultView が返すのは ICollectionView であり、この型は CustomSort を公開していない。
インメモリのコレクションでは具象型が ListCollectionView になるが、DataView などをソースとするビューはそうではない。
そのため、例外を投げうる無条件のキャストではなく、パターンマッチで型を絞り込む。
if (CollectionViewSource.GetDefaultView(dataGrid.ItemsSource) is ListCollectionView view)
{
    view.CustomSort = Comparer<Product>.Create((a, b) =>
        StringComparer.OrdinalIgnoreCase.Compare(a.Name, b.Name));
}
CustomSort は SortDescriptions より優先される。
標準の SortDescriptions によるソートへ戻す場合、SortDescriptions.Clear() だけでは CustomSort が残るため、先に view.CustomSort = null を設定してから SortDescriptions を構成する。
注意点
SortMemberPathが必須になるのは、列のBindingパスと並び替えキーが異なる場合のみである。単純なプロパティにバインドしたDataGridTextColumnでは省略してもソートは機能するが、バインドパスが複雑な場合は明示しておくと予期しない挙動を避けられる。Items.Refresh()はビュー全体を再構築し、現在セルや選択状態をリセットする。大きなコレクションでは処理が目立つため、可能であればグリッドにデータを流し込む前にSortDescriptionsを設定しておく。CustomSortはListCollectionViewのプロパティである。DataViewに対して返されるBindingListCollectionViewなどはListCollectionViewではなくCustomSortを持たないため、上記のパターンマッチはこれをスキップする。この種のソースでは、SortDescriptionsやデータソース側での並び替えなど別の手段で順序を決める。- ソートが変えるのは表示上の順序だけであり、元のコレクションの並びは変わらない。バインド先のコレクションを直接反復するコードは元の順序のままを見る。
まとめ
| シナリオ | 推奨アプローチ |
|---|---|
| 単純な列ソート | CanUserSortColumns="True"(デフォルト) |
| コードからのソート | SortDescriptions + SortDirection 更新 |
| カスタムソートロジック | ListCollectionView.CustomSort |
業務アプリの多くはデフォルト機能で対応できる。
CustomSort は SortDescription では表現できない特殊な並び替えが必要なときだけ使用するのが運用上の目安である。