Overview
This article describes how to bring Fluent-style visual design to a WPF application without adding external UI libraries.
The approach uses built-in WPF styling, spacing, corner radius, visual hierarchy, and SystemColors so the UI can stay aligned with Windows color settings.
Prerequisites / Environment
- Framework / Language: .NET 9 / C# 13
- Target UI: WPF
Window,UserControl,Button,TextBlock - Architecture: MVVM or code-behind (the XAML patterns in this article work for both)
- Constraint: no external Fluent UI library (for example, MahApps.Metro or ModernWpf)
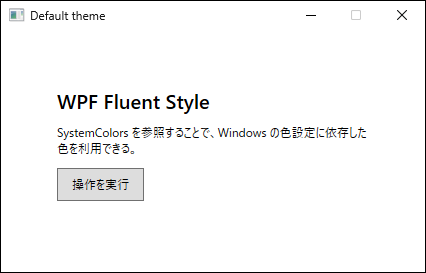
Problem
The default WPF theme is stable and predictable, but its visual density and spacing often diverge from current Windows design language.
In multi-window business applications, default control styles can make interaction priority less clear, especially when all elements have similar weight and low hierarchy contrast.
Cause / Background
WPF provides flexible rendering and templating, but Fluent-specific visuals are not automatically applied by default.
A Fluent-like result requires explicit decisions for:
- corner radius and spacing,
- hierarchy separation through background and border contrast,
- limited and intentional accent usage,
- colors that remain consistent with OS-level settings.
SystemColors is important in this context because it allows referencing colors derived from Windows configuration instead of hard-coded values.
Solution
Without external libraries, combine the following:
- Define Fluent theme activation at the application level in
App.xaml, using eitherThemeModeor the Fluent resource dictionary merge. - Use
DynamicResourcewithSystemColors.*BrushKeyso colors stay reactive to runtime Windows color changes. - Define control templates for corner radius, spacing, and hover/press feedback.
- Separate page background, card surface, and accent roles to improve visual hierarchy and readability.
For .NET 9 Fluent theme adoption across an entire app, App.xaml configuration is the key step.
If setup is done only per window, consistency becomes difficult as new screens are added.
Implementation
1. Enable Fluent Theme in App.xaml
To apply Fluent styling at the application level, configure App.xaml.
In .NET 9, there are two valid options.
Use ThemeMode:
<Application x:Class="Sample.App"
             xmlns="http://schemas.microsoft.com/winfx/2006/xaml/presentation"
             xmlns:x="http://schemas.microsoft.com/winfx/2006/xaml"
             StartupUri="MainWindow.xaml"
             ThemeMode="System">
  <Application.Resources>
    <ResourceDictionary />
  </Application.Resources>
</Application>
Use the Fluent resource dictionary:
<Application x:Class="Sample.App"
             xmlns="http://schemas.microsoft.com/winfx/2006/xaml/presentation"
             xmlns:x="http://schemas.microsoft.com/winfx/2006/xaml"
             StartupUri="MainWindow.xaml">
  <Application.Resources>
    <ResourceDictionary>
      <ResourceDictionary.MergedDictionaries>
        <ResourceDictionary Source="pack://application:,,,/PresentationFramework.Fluent;component/Themes/Fluent.xaml" />
      </ResourceDictionary.MergedDictionaries>
    </ResourceDictionary>
  </Application.Resources>
</Application>
Either option is sufficient.
Defining one of them in App.xaml first keeps window-level styling focused on local adjustments and reduces theme drift across screens.
2. Use SystemColors in Window-Level Styling
After app-level theme setup, define local styles for layout hierarchy and interaction feedback.
The following sample uses SystemColors through DynamicResource.
<Window x:Class="Sample.MainWindow"
        xmlns="http://schemas.microsoft.com/winfx/2006/xaml/presentation"
        xmlns:x="http://schemas.microsoft.com/winfx/2006/xaml"
        Title="Fluent Without External Libraries"
        Width="800" Height="480"
        Background="{DynamicResource {x:Static SystemColors.WindowBrushKey}}">

  <Window.Resources>
    <SolidColorBrush x:Key="CardBackgroundBrush"
                     Color="{Binding Source={x:Static SystemColors.ControlLightColor}}" />

    <Style x:Key="CardBorderStyle" TargetType="Border">
      <Setter Property="Padding" Value="24" />
      <Setter Property="CornerRadius" Value="12" />
      <Setter Property="BorderThickness" Value="1" />
      <Setter Property="Background" Value="{StaticResource CardBackgroundBrush}" />
      <Setter Property="BorderBrush"
              Value="{DynamicResource {x:Static SystemColors.ActiveBorderBrushKey}}" />
    </Style>

    <Style x:Key="FluentLikeButtonStyle" TargetType="Button">
      <Setter Property="Padding" Value="14,8" />
      <Setter Property="Margin" Value="0,12,0,0" />
      <Setter Property="Foreground"
              Value="{DynamicResource {x:Static SystemColors.ControlTextBrushKey}}" />
      <Setter Property="Background"
              Value="{DynamicResource {x:Static SystemColors.ControlBrushKey}}" />
      <Setter Property="BorderBrush"
              Value="{DynamicResource {x:Static SystemColors.ActiveBorderBrushKey}}" />
      <Setter Property="BorderThickness" Value="1" />
      <Setter Property="Template">
        <Setter.Value>
          <ControlTemplate TargetType="Button">
            <Border x:Name="Root"
                    Background="{TemplateBinding Background}"
                    BorderBrush="{TemplateBinding BorderBrush}"
                    BorderThickness="{TemplateBinding BorderThickness}"
                    CornerRadius="8">
              <ContentPresenter HorizontalAlignment="Center"
                                VerticalAlignment="Center" />
            </Border>
            <ControlTemplate.Triggers>
              <Trigger Property="IsMouseOver" Value="True">
                <Setter TargetName="Root" Property="Opacity" Value="0.92" />
              </Trigger>
              <Trigger Property="IsPressed" Value="True">
                <Setter TargetName="Root" Property="Opacity" Value="0.82" />
              </Trigger>
              <Trigger Property="IsEnabled" Value="False">
                <Setter TargetName="Root" Property="Opacity" Value="0.55" />
              </Trigger>
            </ControlTemplate.Triggers>
          </ControlTemplate>
        </Setter.Value>
      </Setter>
    </Style>
  </Window.Resources>

  <Grid Margin="32">
    <Border Style="{StaticResource CardBorderStyle}">
      <StackPanel>
        <TextBlock FontSize="24"
                   FontWeight="SemiBold"
                   Foreground="{DynamicResource {x:Static SystemColors.ControlTextBrushKey}}"
                   Text="WPF Fluent Style" />

        <TextBlock Margin="0,10,0,0"
                   TextWrapping="Wrap"
                   Foreground="{DynamicResource {x:Static SystemColors.GrayTextBrushKey}}"
                   Text="SystemColors enables colors that follow Windows color settings." />

        <Button Style="{StaticResource FluentLikeButtonStyle}"
                Content="Run Action" />
      </StackPanel>
    </Border>
  </Grid>
</Window>
This keeps the implementation dependency-free while improving hierarchy and interaction feedback.
Because key brushes are resolved through DynamicResource, changes in Windows color settings can propagate during runtime.
SystemColors.AccentColorBrushKey can be used where accent emphasis is needed.
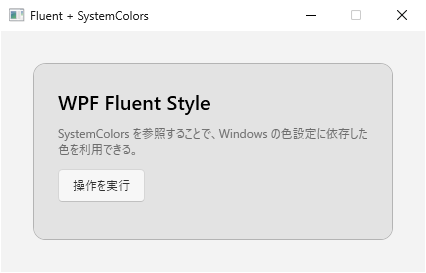
ThemeMode and SystemColors applied and no external libraries involved. Compared with the figure in the Problem section, the card surface separates from the background and the rounded corners and spacing establish a hierarchy.Notes
- This approach reproduces Fluent design principles, not a full WinUI material stack. Effects such as Mica or Acrylic are outside this baseline.
- For app-wide Fluent adoption in .NET 9, configure either
ThemeModeor the Fluent dictionary inApp.xaml. Relying only on per-window configuration increases the chance of theme omissions. - Prefer
DynamicResourceforSystemColorsreferences when runtime color tracking is required. - For larger applications, centralize shared styles in
App.xamlor a commonResourceDictionaryto avoid duplication.
Alternatives / Comparison
| Method | Advantages | Disadvantages | Best suited for |
|---|---|---|---|
WPF built-in styles + SystemColors |
No additional package dependencies, easier long-term maintenance, OS color alignment | Limited advanced Fluent material effects | Existing WPF systems with maintenance-first priorities |
| External Fluent UI library | Faster visual unification with ready-made themes | Dependency lifecycle and compatibility checks are required | New apps with high UI delivery speed requirements |
| Fully custom rendering | Maximum visual freedom | Highest implementation and testing cost | Products with strict custom branding requirements |
Summary
Fluent-style UI in WPF can be implemented without extra libraries.
The practical baseline is: configure Fluent activation in App.xaml (either ThemeMode or Fluent dictionary), then build visual hierarchy with spacing and corner radius, and reference SystemColors through DynamicResource for Windows-aware color behavior.
This approach is generally the most maintainable option for long-lived WPF applications.